Monday, February 27, 2012

St. Patty's Day Leprechaun

St. Patrick's Day needs a little leprechaun. I designed this for our preschoolers to create in the next few weeks. These projects also help to transition our classroom from hibernation into spring!

Items needed:
small paper plate
flesh colored paint (or make your own with white and a small amount of red and yellow)
paint brush
construction paper in green, black, orange, red and brown or pink (for ears)
medium googly eyes
glue


First we start out by painting the back of the plate. It's easier to glue everything on to the back than to the front. Put it off to the side to dry. (We will have the kids paint their plates on one day and glue another.


Cut out the different parts to the leprechaun. I started by gluing on the eyebrows and the beard.


Then glue on the ears, feet, hat and band. The eyes are glued on last. The kids will have their own version of your sample and it will not match. And that's okay. They are learning to follow instructions and expressing their creative self. That's the main goal! After we do this project, I will take pictures and show the various "interpretations!" (I had more pictures of step by step but they vanished off the camera!)

St. Patty's Day Shamrocks

I would have posted this sooner but caught the creeping crude that goes around this time of year. This is a very easy project to do with almost any age.

Items needed:
pen
white construction paper
BLEEDING tissue paper in green cut into small squares
MAKE SURE IT IS BLEEDING TISSUE OR IT WON'T WORK!
squirt bottle filled with water
scissors

To begin:


Using a pen, trace the shape of a shamrock onto the white paper using a pen. I didn't have a shamrock shape, so I created my own using a glass. It took several tries to get it almost proportionate but this will work. If working with a group of kids, write their names in pen on the backside. The ink won't bleed. Using a marker will cause the name to bleed and make it hard to read as well as bleed to the front of the design.


Bleeding tissue paper is found at most art supply stores. Michaels carries it-usually near the scrapbooking section. Have the kids add a layer of the tissue paper onto the shamrock. With smaller kids, they have a tendency to dump handfuls on. Not much is needed to create the look. You can also use some yellow and that will give you several different shades of green!


Now the fun part! I found a bottle at the hardware store. They are usually in the gardening section. But an old hairspray bottle, cleaned out can also work. Spray water over the entire piece. Kids love to spray water! This starts the bleeding process immediately!


This shows the paper completely covered in water.


After spraying, set your picture off to the side to dry completely. Depending on how much water the kids added, the drying times will differ. They can rip if too wet.


Once they are dry, the tissue paper comes right off with a brush of the hand. (Mine was still wet when I did this) You can see the beautiful coloring left behind! The kids can then cut out the shape and they are ready for hanging up!

We will be doing this project and creating a patch of clovers on the wall. I will make a four leafed one to hide in the grouping. Shh. . .

Tuesday, February 21, 2012

Shamrock Wreath

Well we will be heading into March pretty soon and that means St. Patrick's Day! So I decided to get a jump on our projects while I had some free time. Today's post is a Shamrock Wreath. The kids can make this and take it home to hang on their doors! I still need to add the string for hanging but it is still drying.

Items needed:
1 large paper plate with the center cut out
brown paint
shamrocks in two different colors (we have a die cutting machine at work so I cheated!) I used 5 for this project
yellow construction paper (if not using foil)
glue
scissors

if using foil -
gold foil glued to any color paper
silver foil and color with yellow markers after gluing to paper
you can also use metallic paint in gold


Start by having the kids paint the entire backside of the plate in brown. (It's easier to glue everything on this side) Put off to the side and let to dry. We will have the kids paint this when they first get to class so we have time for it to dry before art.


I painted a thin layer of gel medium onto the paper (my glue bottle was mad at me so I had to improvise) and then I laid the gold foil on top. (My husband works at a printing company and brought this small roll home that was unusable by them) Run the side of your hand across to smooth it out and remove any air bubbles.


As you can see, because the paper is thin, it curls up when finished gluing. Lay the sheet face down and put something heavy on top to flatten it. After about five minutes, it is okay to start cutting. Using sharp scissors helps too. I used a spool of thread to trace the circles. Tracing on the backside makes it much easier to see when cutting. We don't have a die that small so it's by hand for me.


Here are some of the shamrocks made on the diecut machine. I think it is by AccuDie but not sure. Don't look too closely at the shamrocks as I didn't have the paper completely covered on the die and chopped off small pieces. I decided to use those for my class sample and let the kids use the nice ones. I am such a good person ;) Glue each one down, alternating between the two colors and overlapping slightly.


To finish this off, I glued gold circles (coins) around the wreath. I made a small black pot for the "pot o' gold" and glued a couple coins to the back. I then glued the pot onto the bottom of the wreath. To finish this off, I will hole punch at the top and run string through for hanging. Happy early St. Patrick's Day to you!

Monday, February 20, 2012

Weather Mobile

Learning about the weather is fun. As we learned about the different types of weather, the preschoolers created a piece each day to put on their mobile. All of them hanging up together made our room bright and lively.


Items needed:
1 wire hanger per mobile
construction paper in yellow, orange, light blue and white
small piece of poster board in white
two cotton balls
glitter - gold and silver
glue
foil
blue and white paint
hole punch
puffy paint!


Our first part was the cloud. We traced an easy cloud shape on paper and had the preschoolers cut them out. Then they added glue all over the cloud and covered it with the cotton balls. You may have to show them how to pull it apart so they have enough to cover the whole cloud.


We traced and cut a simple lightening bolt shape onto the poster board. It is hard to cut so we did that part for them. We gave them each a small sheet of foil and they had to wrap it around the cardboard bolt. It was a little difficult. We found giving them strips of foil to wrap around was a little easier to manage.


The raindrop was fun. We traced the shape of the raindrop onto white construction paper. They cut out the shape and we painted it with puffy paint. The puffy paint was made with shaving cream and glue. The blue coloring was a couple drops of liquid water colors. You could also use food coloring or paint. We put a dollop of the puffy paint onto their raindrop and they had to smear it around so the whole drop was covered.


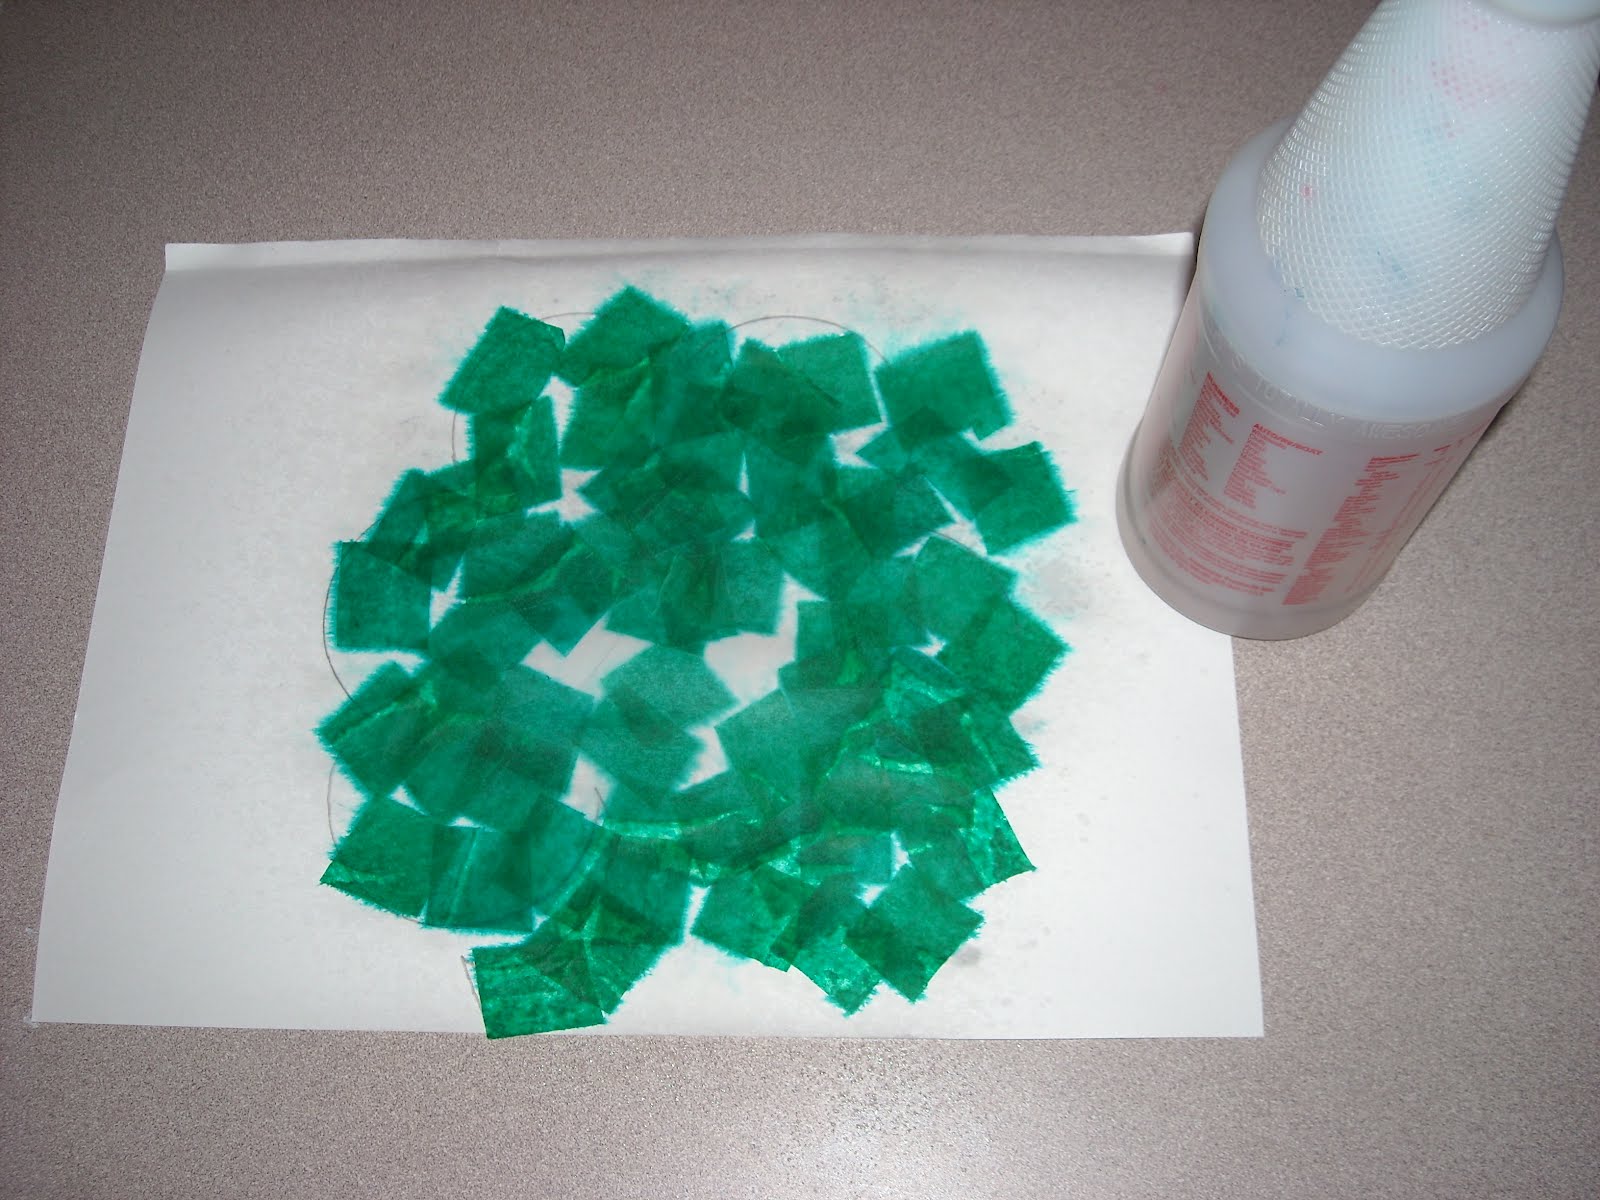
To create the snowflake, we gave them each a small square of blue construction paper - or the equivalent of a quarter of an 8.5" x 11" piece of paper. They were given a tray of paint containing blue and white tempera paint and a small paint brush. They were told to paint the entire side with a mixture of the two colors. When they were done, we sprinkled some silver glitter on it and put it off to the side to dry.


The final piece was the sun. Now we traced a little sun shape on yellow construction paper and realized they would probably struggle with cutting on this. More likely, they would cut all the tips off! So we did that part for them. They had to cut out the center circle in orange and glue it to the center of the sun. Each child was then given a bottle of glue to draw on a pattern. When they were satisfied with that part, we sprinkled gold glitter on, shaking off the excess. Bottles of glitter glue could also be used so that the glue and glitter are done in one step.

Assembly:

The snowflake needed to be finished before we could assemble. Remember those days as a child, you folded up paper and made random cuts. Then you opened them up to reveal a paper snowflake? Well you can do that to make it more snowflake like or in our example, we cut a curvy shape around the outside and then used a paper punch to create holes inside it. Either works.

After all the pieces were dry, we punched a hole at the top of each and ran a piece of yarn through it and tied with a simple knot. The yarns should be in different lengths so the pieces don't bang into each other on the hanger. Attach the yarn at the base of the hanger and tie a simple knot. Hang your mobile up and enjoy!

Sunday, February 19, 2012

Polar Animal - Walrus

While looking for polar animals, I kept seeing the walrus. They are pretty cute! But I had to make them a little more simplified for our preschoolers.

Items needed:
brown, light brown or gray, and white construction paper
glue
scissors
black marker
yarn (I had rug hooking yarn on hand in light yellow and pulled the strands apart to make four pieces)


This was another activity to help with cutting skills. We traced the body shape onto the brown paper and had the kids cut them out. We cut out the tusks, legs and the nose ahead of time and had the kids glue them on. Before adding the whiskers, they had to draw in the eyes, and the dots on the nose. The final step was to glue the whiskers in place.


The best part of this project was the facial expressions that the kids drew on. One had eyebrows and another looked angry! We used one of our bulletin boards and created a snowy backdrop and placed the walrus' all around. The kids really loved this project.

Polar Animal - Polar Bear

This was a fun project and quite labor intensive. My inspiration for this one came from a photo of a polar bear peeking up over the edge of the iceberg. Once the kids finished their version, we hung them on the clothesline in class, side by side, so it looked like a row of bears peeking at us.

Items needed:
White, blue, black and gray construction paper
scissors
black marker
glue
shaving cream

Shaving cream? What?!! Don't worry, I will explain shortly.
First things first, trace the head shape on white paper. We cut out the ears in white and black, gluing the two together. Then the gray snout and black nose was traced, cut and assembled. Finally the eyes were traced, cut and glued together and drawing the black center in with marker. A blue rectangle was cut also.

The kids then cut out the head, glued on the ears, nose and eyes. The could draw in a mouth if they wanted using the black marker.
Then they glued the head to the back of the blue paper (iceberg). Now depending on the kids skill sets, if the project is not overly glued, you can proceed to the next step. Our group has a love affair with glue so we needed to let them dry overnight!


For the iceberg, we painted on puffy paint. Puffy paint is my new favorite project plaything! Keri found it on the internet somewhere and told me about it. She couldn't find the link again so I cannot give credit! Sorry. But she told me what was needed and I just played with it to get it to work. In a small bowl, add about one quarter cup of white glue. Then add a mound of shaving cream. I eyeball everything. But for those less adventurous, it should fill the palm of your hand and be about three inches high. You can't really screw this up. Mix the two together with a large paintbrush. I mixed it using a folding technique like when baking. Don't overdo it or the puffy will not be there. Less than a minute of mixing seems to be adequate. The end product will be still puffy but with a slight shine from the glue. This is the only tricky part. Kids have a tendency to paint it flat. I recommend putting a huge dollop on the blue paper and have them smear it around to all the edges. Let dry overnight.
The next day, you will have a puffy surface but will be dry to the touch! This is also great for fur or snow projects!

Hibernating Bear

This last project was the bear hibernating in a cave. It can coincide with the "Bear Snores On" book by Karma Wilson. Check out her website for more info on this series of books at karmawilson.com/books/bear/snores.htm
This project was great for practicing simple scissor skills and following directions.
Items needed:
1 small sheet gray construction paper
1 small sheet black construction paper
1 sheet brown construction paper
1 small piece of paper each in light brown, white, black
glue
black marker
scissors

First step is to draw a "cave" on the gray sheet of paper and one in black. (Use white or yellow colored pencil on the black paper to make it easier to see for cutting purposes)
Cut a small square of white paper and write "Do Not Disturb" inside the box.
Depending on your time, you can trace and cut out the bear or just trace and have the kids cut out. I based our bear shape loosely on the bear from the book to tie the two together. I drew in the arms and toe nails for the kids.
The final pieces are the black pieces for the ears, the light brown for the snout and the black oval for the nose. These were all cut out for the kids.


To assemble:
The children had to cut out the gray stone and glue on the do not disturb sign.


Next, they cut out the black stone or cave and glue the brown bear inside. Finally, they glue the insides of the ears, the snout and the black nose. The final step is the best. They have to draw the bears eyes and he is sleeping. Did we get some creative looking bears!

We stapled the tops together once the project was dry and hung them around the room.

Thursday, February 16, 2012

Hibernating Bats

Another animal that hibernates is the bat. (Animal??) Anyway, it is something that hibernates and so I created this little guy for the kids to make.
Items needed:
Brown construction paper
1 clothespin
brown paint
two very small googly eyes
glue

Earlier, I had the kids paint their clothespins brown and set them aside to dry. While the clothespins are drying, trace the bat shape onto brown construction paper. I made it a very simple bat shape so they could work on their scissor skills. They did a pretty good job.


Next step is to glue the clothespin onto the bat body. Now you want to make sure that that clip end is hanging out so that it will hang upside down from the clothesline. And then we glue on the eyeballs.


Final part is to bring the wings together in front and glue. I found it a little easier to do by squashing it down on either side, making a slight crease. The kids will need help with this part depending on their age. Our group is between ages 4 and 5.

Final step is to hang them upside down on the clothesline so they could sleep. The kids can't wait to take this project home!


Monday, February 13, 2012

Hibernating Raccoons


Recently one of the themes at the preschool was hibernating. Our room has been transformed into a hibernation station! Sshhhh. One of the animals that we found to hibernate was the raccoon. They are not true hibernators but they do technically fall into the hibernating group. This ended up being a two day project. For the first day, I put large sheets of paper on the tables for the kids to paint. I put brown, black and blue into the paint trays with the instructions to cover every last inch of the papers. Either we haven't been painting much, or the kids really wanted to paint that day! Almost every inch of the paper was covered on all four sheets! Wow!
After letting the paper dry overnight, I created a tree log for our critters to hang in. First step was a larger roundish circle for the end of the log, then folding the paper into a ruffled look, taper it to the side of the opening, to form the log itself. Left over scraps created the branch and I added leaves from construction paper to the branch.
Day two was the construction of the raccoon faces. The kids always want to glue the eyeballs on first which is a problem because the raccoons have masks! Crisis was averted several times! The kids loved putting the faces together and before the class the next day (and ample drying time) we taped them inside the log. I love the final finish of this project. The raccoons almost look like we looked inside their hiding place and woke them up!
I have created templates for this project but need to trace onto one sheet, scan and figure out how to post it on the page as a download if anyone is interested in making this project.

Welcome!

Thank you for stopping by my blog. As you can see, I'm just getting started. The plan for this blog is to post the many art ideas and projects I have created for our local preschool and girl scout troops.
I have been an artist my whole life but have only recently had the guts to claim that title. My kids, hubby and family have been very supportive in helping me get comfortable in those shoes. I was a girl scout leader for my daughters troop for several years and loved taking the project ideas they had and tweaking them a bit to make them even more fun and exciting. The girls loved coming each week! I also took a job at the local preschool and have been honored to help plan and execute many of the art projects they do each day. So after encouragement from many of my coworkers, friends etc. I am going to start sharing them with you!